源码分析 kubernetes client-go workqueue 的实现原理
k8s 的各个 controller 控制器内都有使用 workqueue 做事件队列. 为了满足各个控制器不同队列需求, k8s client-go 内置各种符合需求的 workqueue 队列. workqueue 不仅实现了队列的基本功能, 还实现了去重、延迟、限频等功能.
基于 kubernetes client-go v0.26.0 源码分析
为什么队列需要去重功能 ?
当一个资源对象被频繁变更, 然而同一个对象还未被消费, 没必要在在队列中存多份, 经过去重后只需要处理一次即可.
为什么需要 delay 延迟入队功能 ?
有些 k8s controller 是需要延迟队列功能的, 比如像 cronjob 依赖延迟队列实现定时功能. 另外也可以实现延迟 backoff 时长后重入队.
为什么需要限频功能 ?
避免过多事件并发入队, 使用限频策略对入队的事件个数进行控制. k8s 中的 controller 大把的使用限频.
informer 中的 deltafifo 跟 workqueue 区别?
deltafifo 虽然名为 fifo 队列, 但他的 fifo 不是全局事件, 而只是针对某资源对象的事件进行内部 fifo 排列. 比如某个 deployment 频繁做变更, 那么 deltafifo 逻辑是把后续收到的相关事件放在一起.
如果对 informer deltafifo 的实现原理感兴趣, 请阅读下文.
workqueue 中内置了三种队列模型
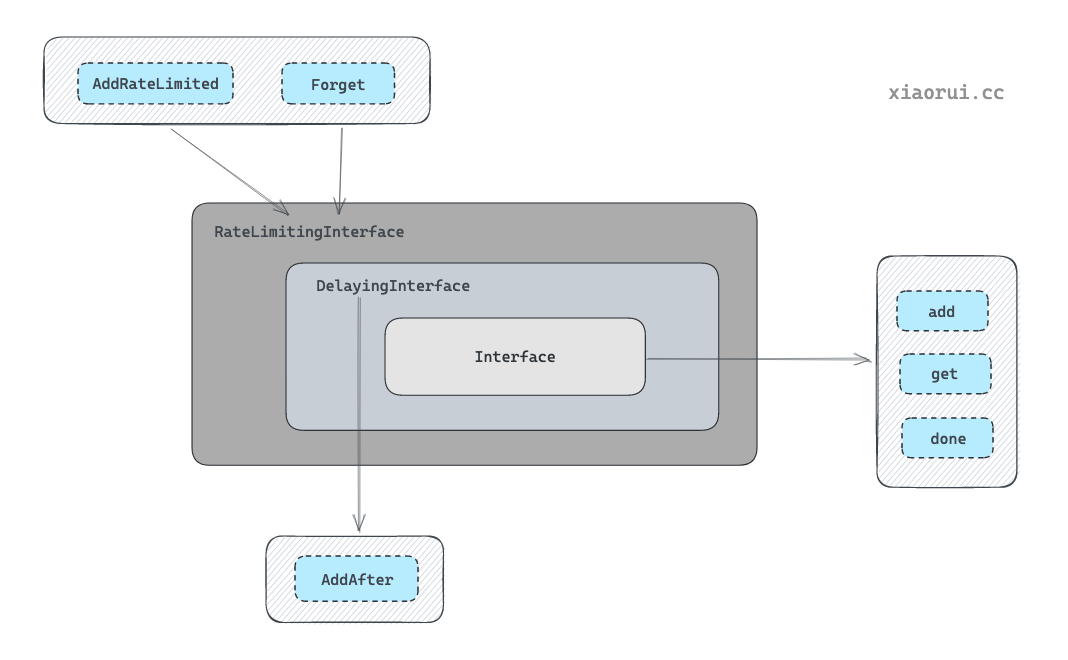
Interface
实现了基本的先进先出队列, 跟常规队列相比多了去重功能.
DelayingInterface
在 Interface 的基础上, 实现了延迟队里功能.
RateLimitingInterface
又在 DelayingInterface 的基础上, 实现了 RateLimiter 限频器功能. 当插入元素的次数超过限频器规则时, 则把对象推到延迟队列中处理.
去重队列 Queue Interface 实现
queue 实现基本的先进先出队列, 跟常规队列相比多了去重功能.
源码位置: util/workqueue/queue.go
queue 接口定义
下面是 workqueue Interface 接口的定义.
这接口名直接叫 Interface 颇为绕.
type Interface interface {
    // 添加元素
    Add(item interface{})

    // 获取队列的长度, queue 字段的长度
    Len() int

    // 从队列中获取元素
    Get() (item interface{}, shutdown bool)

    // 标记元素执行完毕
    Done(item interface{})

    // 关闭
    ShutDown()

    // 是否关闭
    ShuttingDown() bool
}
queue 数据结构
Type 结构体实现了 workqueue Interface 接口.
这结构体名直接叫 Type 也颇为绕.
type Type struct {
    // 使用 slice 切片存放元素, 顺序为 fifo 模式, 写为 append 追加, 读则从头部获取.
    queue []t

    // 使用一个 set 集合做去重操作, 避免未消费的队列中相同的元素.
    dirty set

    // 也是个 set 集合, 其目的是避免相同的元素被并发执行, 有了 processing 后, 当某个元素正在执行, 另一个生产者只能把元素放到 dirty 集合里做去重, 等待上一个元素干完了后, 这个元素才会重写入 dirty 里.
    processing set

    // 条件变量, 用来唤醒等待元素的协程
    cond *sync.Cond

    // 用来统计指标
    metrics queueMetrics
}
queue
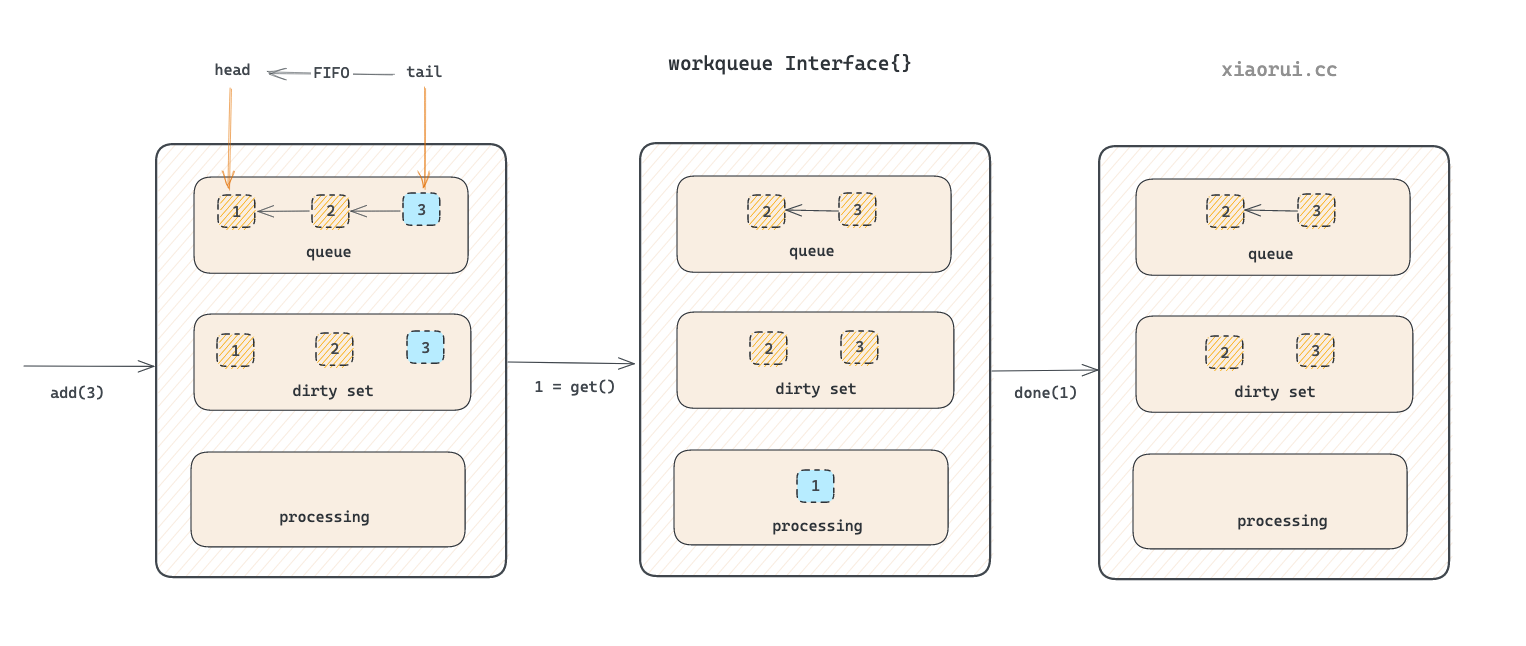
queue 用来实现顺序存储元素的, 其结构为 slice 切片类型, 元素类型为 interface{} 任意类型. queue 读写流程为读 slice 的头部, 写 slice 的尾部. queue 是 FIFO 先进先出的设计.
dirty set
dirty 用来实现去重的, 所以他采用了 set 数据结构. 但是他的去重只是针对待消费的元素.
processing set
processing 也是用来去重的, 其主要规避元素被并发处理. 当元素还未被处理时, 通过 dirty 来去重, 当前 queue 只有一个元素, 而当元素已经被执行, 但还未调用 Done 标记完成, 这时候同一个元素再入队, 会放到 dirty 做去重和排队的效果.
简单一句话, 因为有了 dirty 和 processing 两个集合, queue 队列最大程度去重, 严格避免同一个元素被并发调用, 但会串行调用, 这符合 kubernetes controller 的场景设计.
queue 关键方法实现
Add() 添加元素
Add() 为元素插入到队列的方法. 插入元素的流程原理如下.
- 判断 dirty 是否存在该元素, 如存在则直接跳出, 其目的是为了实现待处理元素的去重效果.
- 然后在 dirty 里添加元素, 再判断 processing 集合是否存在元素, 如果存在则跳出. 其目的是为了防止同一个元素被并发处理.
- 在 processing 集合里加入元素.
- 使用 cond signal 唤醒其他陷入阻塞的协程.
func (q *Type) Add(item interface{}) {
    // 加锁保证并发安全
    q.cond.L.Lock()
    defer q.cond.L.Unlock()

    // 已关闭直接退出
    if q.shuttingDown {
        return
    }

    // 如果 dirty 已存在, 则直接退出, dirty 是为了实现待消费元素的去重.
    if q.dirty.has(item) {
        return
    }

    // 增加 add 的指标
    q.metrics.add(item)

    // 每次 add 的元素也要放到 drity 集合里, 为了去重效果.
    q.dirty.insert(item)

    // 如果这个元素正在处理, 那么在把元素放到 diry 后就完事了. 后面由 Done 方法来处理 dirty -> queue 的逻辑.
    if q.processing.has(item) {
        return
    }

    // 把元素放到队列里
    q.queue = append(q.queue, item)

    // 通知等待的协程处理任务
    q.cond.Signal()
}
Get() 获取元素
Get() 为获取元素的方法. 从队列的头部获取最先入队的元素, 然后在 processing 集合中添加元素, 其目的就是为了方式同一个元素对象被并发处理. 最后从 dirty 集合里删除对象, 因为 dirty 是为了实现的待消费去重, 既然从 queue 拿走元素, dirty 也需要删除.
func (q *Type) Get() (item interface{}, shutdown bool) {
    // 线程安全
    q.cond.L.Lock()
    defer q.cond.L.Unlock()

    // 如果队列为空则陷入 cond 等待
    for len(q.queue) == 0 && !q.shuttingDown {
        q.cond.Wait()
    }

    // 如果关闭了且队列为空, 直接 return
    if len(q.queue) == 0 {
        return nil, true
    }

    // 从头部获取元素
    item = q.queue[0]
    q.queue[0] = nil

    // 重新引用切片
    q.queue = q.queue[1:]

    // 统计 metrics get 指标
    q.metrics.get(item)

    // 从 dirty set 里去除, 加到 processing 集合里.
    q.processing.insert(item)
    q.dirty.delete(item)

    return item, false
}
Done() 获取元素
Done() 用来标记某元素已经处理完, 可以从 processing 集合中去除, 然后判断 dirty 集合中是否有该对象, 如果存在则把该对象推到 queue 里再次入队. 这么让人迷糊的过程, 通过 processing 标记该元素正在被处理但还未完成, 其目的就是为了防止一个元素被并发同时处理.
如果一个元素正在被处理, 这时候如果再次添加同一个元素, 由于该元素还在处理未完成, 只能把对象放到 dirty 里, 为什么不放到 queue slice 里, 因为放 queue slice 里, 并发消费场景下, 同一个元素会被多个协程并发处理. 当执行完毕调用 Done() 时, 会把 dirty 的任务重新入队, 起到了排队的效果.
func (q *Type) Done(item interface{}) {
    // 线程安全
    q.cond.L.Lock()
    defer q.cond.L.Unlock()

    // 统计 metrics done 指标
    q.metrics.done(item)

    // 从 processing 集合中剔除
    q.processing.delete(item)

    // 如果 dirty 还有, 那么把该元素加到 queue 队列里.
    if q.dirty.has(item) {
        q.queue = append(q.queue, item)
        q.cond.Signal()
    } else if q.processing.len() == 0 {
        // 想不明白有走到这个逻辑的可能.
        q.cond.Signal()
    }
}
到此对于 queue 的实现原理已然明了, 再提炼总结下 queue 内部两个集合的作用.
- dirty 是对待消费的元素进行去重, 所谓待消费就是未被处理中.
- processing 是对正在处理的元素进行去重和重排队.
set 的实现原理
使用 map 结构实现的 set 集合, key 为 interface{} 类型, 存的是队列里的元素.
type t interface{}

type set map[t]empty

func (s set) has(item t) bool {
    _, exists := s[item]
    return exists
}

func (s set) insert(item t) {
    s[item] = empty{}
}

func (s set) delete(item t) {
    delete(s, item)
}

func (s set) len() int {
    return len(s)
}
延迟队列 DelayingInterface
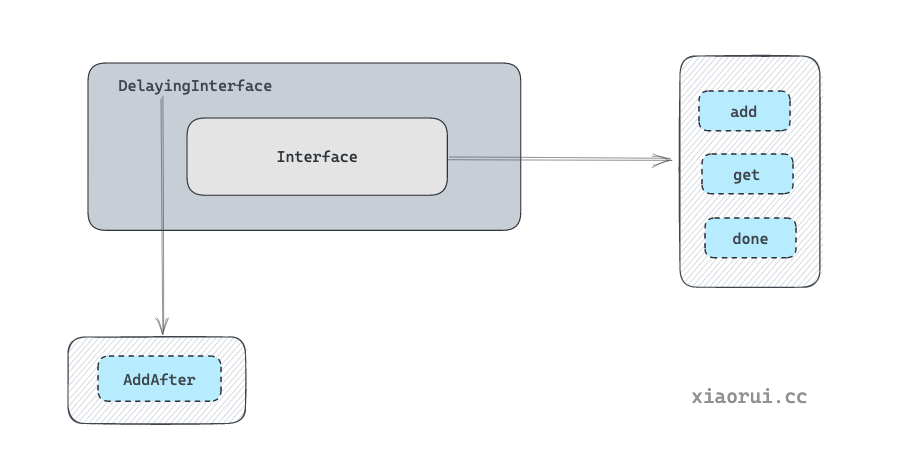
DelayingInterface 是在 Queue Interface 基础上实现的延迟队列.
接口定义
DelayingInterface 实例不仅可以使用 AddAfter 方法, 还可使用 Queue Interface 的接口方法.
type DelayingInterface interface {
    // 继承 Queue Interface 的基本功能
    Interface

    // 添加定时功能
    AddAfter(item interface{}, duration time.Duration)
}
数据结构定义
type delayingType struct {
    // 继承 Queue Interface 队列基本功能
    Interface

    // clock tracks time for delayed firing
    clock clock.Clock

    // 退出通道
    stopCh chan struct{}
    stopOnce sync.Once

    // 周期性检测队列是否有对象到期
    heartbeat clock.Ticker

    // 新的定时元素会推到该管道中, 等待 loop 处理.
    waitingForAddCh chan *waitFor

    // 用来 metrics 统计
    metrics retryMetrics
}
delayingQueue 关键方法的实现原理
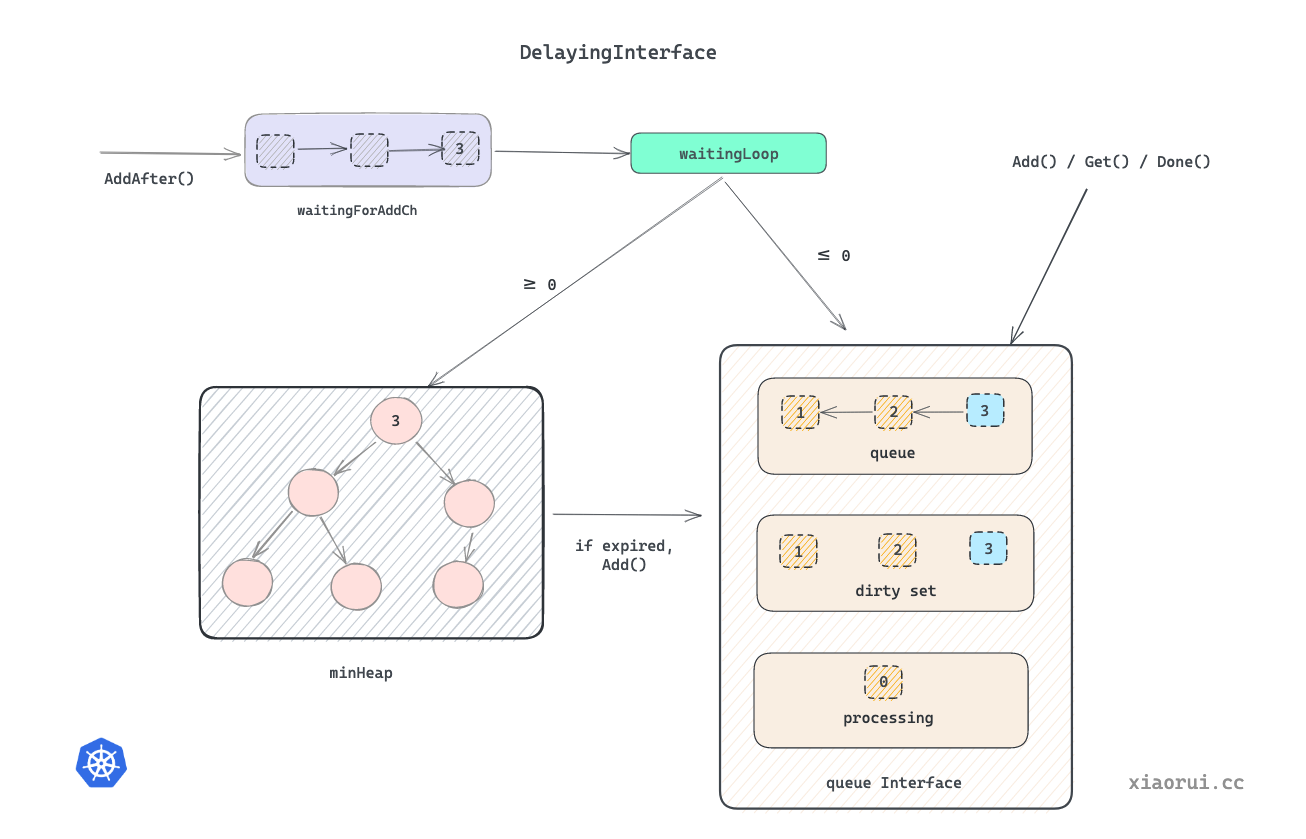
delayingQueue 的代码逻辑还是很清晰的. 首先使用数据结构小顶堆 minheap 来排列定时任务. 当添加定时任务时, 把该任务扔到一个 chan 里, 然后由一个独立的协程监听该 chan, 把任务扔到 heap 中, 该独立协程会从堆里找到最近到期的任务, 并对该任务的进行到期监听, 当定时后期后, 会把到期的定时任务添加到 queue 队列中.
// 心跳的时长
const maxWait = 10 * time.Second

// 构建定时器队列对象方法
func NewDelayingQueueWithCustomClock(clock clock.WithTicker, name string) DelayingInterface {
    // clock 为 k8s 内部封装的时间对象
    // NewNamed 用来生成 Queue.
    return newDelayingQueue(clock, NewNamed(name), name)
}

// 真正的构建定时器队列对象方法
func newDelayingQueue(clock clock.WithTicker, q Interface, name string) *delayingType {
    ret := &delayingType{
        Interface:       q,
        clock:           clock,
        heartbeat:       clock.NewTicker(maxWait),
        stopCh:          make(chan struct{}),
        waitingForAddCh: make(chan *waitFor, 1000),
        metrics:         newRetryMetrics(name),
    }

    go ret.waitingLoop()
    return ret
}

func (q *delayingType) waitingLoop() {
    never := make(<-chan time.Time)
    var nextReadyAtTimer clock.Timer

    // 初始化 min heap 小顶堆
    waitingForQueue := &waitForPriorityQueue{}
    heap.Init(waitingForQueue)

    waitingEntryByData := map[t]*waitFor{}

    for {
        // 如果 queue 已经被关闭, 则退出该 loop 协程.
        if q.Interface.ShuttingDown() {
            return
        }

        now := q.clock.Now()

        for waitingForQueue.Len() > 0 {
            // 如果延迟 heap 不为空, 则获取堆顶的元素.
            entry := waitingForQueue.Peek().(*waitFor)
            // 如果大于当前时间, 则没有到期, 则跳出.
            if entry.readyAt.After(now) {
                break
            }

            // 如果小于当前时间, 则 pop 出元素, 然后扔到 queue 队里中.
            entry = heap.Pop(waitingForQueue).(*waitFor)
            q.Add(entry.data)
            delete(waitingEntryByData, entry.data)
        }

        // 如果小顶堆为空, 则使用 never 做无限时长定时器
        nextReadyAt := never

        // 如果 minheap 小顶堆不为空, 设置最近元素的时间为定时器的时间.
        if waitingForQueue.Len() > 0 {
            if nextReadyAtTimer != nil {
                nextReadyAtTimer.Stop()
            }

            // 从堆顶获取最近的元素
            entry := waitingForQueue.Peek().(*waitFor)

            // 实例化 timer 定时器
            nextReadyAtTimer = q.clock.NewTimer(entry.readyAt.Sub(now))
            nextReadyAt = nextReadyAtTimer.C()
        }

        select {
        case <-q.stopCh:
            return

        case <-q.heartbeat.C():
            // 触发 10s 心跳超时后, 重新进行选择最近的定时任务.

        case <-nextReadyAt:
            // 上次计算的最近元素的定时器已到期, 进行下次循环. 期间会处理该到期任务.

        case waitEntry := <-q.waitingForAddCh:
            // 收到新添加的定时器

            // 如果新对象还未到期, 则把定时对象放到 heap 定时堆里.
            if waitEntry.readyAt.After(q.clock.Now()) {
                insert(waitingForQueue, waitingEntryByData, waitEntry)
            } else {
                // 如果该定时任务已到期, 则调用继承的 queue 的 add 方法.把元素添加到队列中.
                q.Add(waitEntry.data)
            }

            // drain 为取尽的设计, 是一个性能优化点.
            // 尽量在该单次循环中把 chan 读空, 避免留存后 select 阶段总是被唤醒.
            drained := false
            for !drained {
                select {
                case waitEntry := <-q.waitingForAddCh:
                    if waitEntry.readyAt.After(q.clock.Now()) {
                        insert(waitingForQueue, waitingEntryByData, waitEntry)
                    } else {
                        q.Add(waitEntry.data)
                    }
                default:
                    drained = true
                }
            }
        }
    }
}

// 调用方使用 AddAfter 添加定时任务
func (q *delayingType) AddAfter(item interface{}, duration time.Duration) {
    // 如果关闭, 则退出
    if q.ShuttingDown() {
        return
    }

    // 进行统计
    q.metrics.retry()

    // 时间不合理, 直接入队列, 不走堆逻辑
    if duration <= 0 {
        q.Add(item)
        return
    }

    select {
    case <-q.stopCh:
        // 等待退出
    case q.waitingForAddCh <- &waitFor{data: item, readyAt: q.clock.Now().Add(duration)}:
        // 创建一个定时对象, 然后推到 waitingForAddCh 管道中, 等待 waitingLoop 协程处理.
    }
}
通过监听 nextReadyAt 可以等待最近任务的到期, 监听 waitingForAddCh 可以获取新增的时间. 没看懂为什么需要 heartbeat 定时器.
小顶堆实现定时器
使用小顶堆实现定时器, 没什么可说的.
type waitFor struct {
    // 存放元素
    data    t

    // 时间点
    readyAt time.Time

    // 同一个时间点下对比递增的索引
    index int
}

type waitForPriorityQueue []*waitFor

func (pq waitForPriorityQueue) Len() int {
    return len(pq)
}
func (pq waitForPriorityQueue) Less(i, j int) bool {
    return pq[i].readyAt.Before(pq[j].readyAt)
}
func (pq waitForPriorityQueue) Swap(i, j int) {
    pq[i], pq[j] = pq[j], pq[i]
    pq[i].index = i
    pq[j].index = j
}

func (pq *waitForPriorityQueue) Push(x interface{}) {
    n := len(*pq)
    item := x.(*waitFor)
    item.index = n
    *pq = append(*pq, item)
}

func (pq *waitForPriorityQueue) Pop() interface{} {
    n := len(*pq)
    item := (*pq)[n-1]
    item.index = -1
    *pq = (*pq)[0:(n - 1)]
    return item
}

func (pq waitForPriorityQueue) Peek() interface{} {
    return pq[0]
}
RateLimitingInterface 限频队列
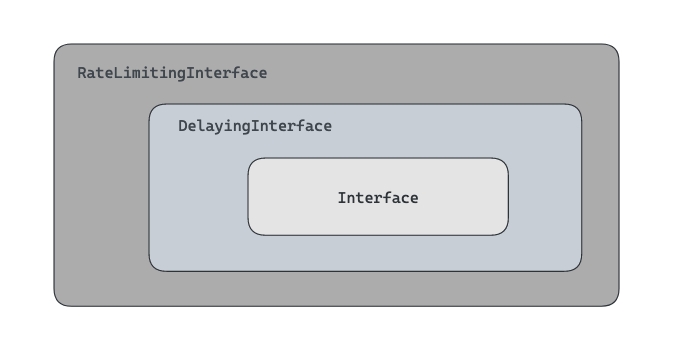
RateLimitingInterface 是在 DelayingInterface 基础上实现的队列. k8s 的 controller/scheduler/ … 组件都有使用 RateLimitingInterface.
通过 AddRateLimited 入队时, 需要先经过 ratelimiter 计算是否触发限频. 如需限频则计算该元素所需的 delay 时长, 把该对象推到 DelayingInterface 延迟队列中处理.
DelayingInterface 内部的 waitingLoop 协程会监听由 AddRateLimited 推入的定时任务, 如果是延迟任务则放到 heap 里, 否则立马推到 Queue 队列里.
接口的定义
type RateLimitingInterface interface {
    // 继承了 DelayingInterface 延迟队列
    DelayingInterface

    // 使用对应的限频算法求出需要 dalay 的时常, 然后添加到 delay 队列中.
    AddRateLimited(item interface{})

    // 在 rateLimiter 中取消某对象的追踪记录.
    Forget(item interface{})

    // 从 rateLimiter 中获取计数.
    NumRequeues(item interface{}) int
}
数据结构
type rateLimitingType struct {
    // 继承延迟队列的工鞥呢
    DelayingInterface

    // 限速组件
    rateLimiter RateLimiter
}
RateLimitingInterface 的代码实现
在实例化 rateLimitingType 时, 需要创建 DelayingInterface 和配置 Ratelimiter.
AddRateLimited 方法是通过限频器计算出需要等待的时长, 然后调用 delayingQueue.AddAfter() 方法来决定把对象扔到延迟队里还是队列里.
k8s 控制器在使用限频类的 workqueue 时, 当入队超过一定阈值后会采用异步的方法来添加任务, 这样对于 k8s controller 来说避免了同步等待, 及时去处理后面任务.
拿 deploment controller 来说, informer 关联的 eventHanlder 方法直接用 Add 入队. 只有错误的时候才会使用 AddRateLimited 进行入队.
另外 Forget 方法是在 rateLimiter 里清理掉某对象的相关记录. 值得注意的是, 不是所有的 rateLimiter 真正的实现了该接口. 具体情况还是要分析 ratelimiter 代码.
// 众多实例化方法之一, 传入 ratelimiter 限频器
func NewRateLimitingQueue(rateLimiter RateLimiter) RateLimitingInterface {
    return &rateLimitingType{
        // 实例化延迟队列
        DelayingInterface: NewDelayingQueue(),

        // 限频器
        rateLimiter:       rateLimiter,
    }
}

// 实现了 RateLimitingInterface 接口
type rateLimitingType struct {
    DelayingInterface

    rateLimiter RateLimiter
}

// 通过限频器计算出需要当代的时间, 如需要等待, 然后把对象扔到延迟队里.
func (q *rateLimitingType) AddRateLimited(item interface{}) {
    q.DelayingInterface.AddAfter(item, q.rateLimiter.When(item))
}

// 从限频器里获取该对象的计数信息.
func (q *rateLimitingType) NumRequeues(item interface{}) int {
    return q.rateLimiter.NumRequeues(item)
}

// 从限频器里删除该对象的记录的信息.
func (q *rateLimitingType) Forget(item interface{}) {
    q.rateLimiter.Forget(item)
}
RateLimiter 的具体的实现
下面为 RateLimiter 的接口定义.
type RateLimiter interface {
    // 获取该元素需要等待多久才能入队.
    When(item interface{}) time.Duration

    // 删除该元素的追踪记录, 有些 rateLimiter 记录了该对象的次数.
    Forget(item interface{})

    // 该对象记录的次数
    NumRequeues(item interface{}) int
}
下面是 workqueue 内置的几个 RateLimiter 限频器. 当然也可以自定义限频器, 只需实现 RateLimiter 接口即可.
- BucketRateLimiter, 通过 rate.Limiter 进行限速.
- ItemExponentialFailureRateLimiter, 通过 backoff 进行限速.
- ItemFastSlowRateLimiter, 超过阈值则使用 fastDelay, 否则使用 slowDelay 等待间隔.
- MaxOfRateLimiter, 抽象了 RateLimiter 方法, 可以同时对多个 rateLimiter 实例进行计算, 最后求出合理值.
源码位置: util/workqueue/default_rate_limiters.go
令牌桶限速器的实现原理
type BucketRateLimiter struct {
    *rate.Limiter
}

// 该类实现了 RateLimiter 接口
var _ RateLimiter = &BucketRateLimiter{}

func (r *BucketRateLimiter) When(item interface{}) time.Duration {
    // 通过 rate 获取新元素需要等待的时间.
    return r.Limiter.Reserve().Delay()
}

func (r *BucketRateLimiter) NumRequeues(item interface{}) int {
    // 直接返回 0.
    return 0
}

func (r *BucketRateLimiter) Forget(item interface{}) {
    // 暂未实现该方法.
}
基于 backoff ratelimiter 的实现原理
使用一个 map 记录了各个元素的计数, 后通过经典 backoff 算法可以求出当前需要等待的时长. 默认为 1, 只要不 Forget 抹掉计数, 那么下次再入队时, 其等待的时长为上次的二次方.
type ItemExponentialFailureRateLimiter struct {
    failuresLock sync.Mutex
    failures     map[interface{}]int

    baseDelay time.Duration
    maxDelay  time.Duration
}

func NewItemExponentialFailureRateLimiter(baseDelay time.Duration, maxDelay time.Duration) RateLimiter {
    return &ItemExponentialFailureRateLimiter{
        failures:  map[interface{}]int{},
        baseDelay: baseDelay,
        maxDelay:  maxDelay,
    }
}

func (r *ItemExponentialFailureRateLimiter) When(item interface{}) time.Duration {
    r.failuresLock.Lock()
    defer r.failuresLock.Unlock()

    // 获取上次技术, 且递增增加一.
    exp := r.failures[item]
    r.failures[item] = r.failures[item] + 1

    // 通过公式计算 backoff 时长, 当前时长为上次的二次方.
    backoff := float64(r.baseDelay.Nanoseconds()) * math.Pow(2, float64(exp))
    if backoff > math.MaxInt64 {
        // 不能超过 maxDelay
        return r.maxDelay
    }

    // 把纳秒的时间戳转成 time duration
    calculated := time.Duration(backoff)
    if calculated > r.maxDelay {
        // 不能超过 maxDelay
        return r.maxDelay
    }

    return calculated
}

// 获取该对象的入队的次数.
func (r *ItemExponentialFailureRateLimiter) NumRequeues(item interface{}) int {
    r.failuresLock.Lock()
    defer r.failuresLock.Unlock()

    return r.failures[item]
}

// 不在追踪该对象, 在这里是不记录该对象的次数.
func (r *ItemExponentialFailureRateLimiter) Forget(item interface{}) {
    r.failuresLock.Lock()
    defer r.failuresLock.Unlock()

    delete(r.failures, item)
}
MaxOfRateLimiter 的实现原理
MaxOfRateLimiter 实例化时可以传入多个 RateLimiter 限速器实例, 使用 When() 求等待间隔时, 遍历计算所有的 RateLimiter 实例, 求最大的时长. Forget() 同理, 也是对所有的 RateLimiter 集合遍历调用.
type MaxOfRateLimiter struct {
    // 多个 ratelimiter 实例
    limiters []RateLimiter
}

func (r *MaxOfRateLimiter) When(item interface{}) time.Duration {
    ret := time.Duration(0)
    // 依次调用, 求最大的时长
    for _, limiter := range r.limiters {
        curr := limiter.When(item)
        if curr > ret {
            ret = curr
        }
    }

    return ret
}

// 创建入口
func NewMaxOfRateLimiter(limiters ...RateLimiter) RateLimiter {
    return &MaxOfRateLimiter{limiters: limiters}
}

func (r *MaxOfRateLimiter) NumRequeues(item interface{}) int {
    ret := 0
    // 依次调用, 求最大
    for _, limiter := range r.limiters {
        curr := limiter.NumRequeues(item)
        if curr > ret {
            ret = curr
        }
    }

    return ret
}

func (r *MaxOfRateLimiter) Forget(item interface{}) {
    // 依次调用
    for _, limiter := range r.limiters {
        limiter.Forget(item)
    }
}
总结
client-go workqueue 共实现了三个队列类型.
Interface 为基本的队列类型. DelayingInterface 在 Interface 基础上实现的延迟队列. RateLimitingInterface 又在 DelayingInterface 基础上实现的限频队列.
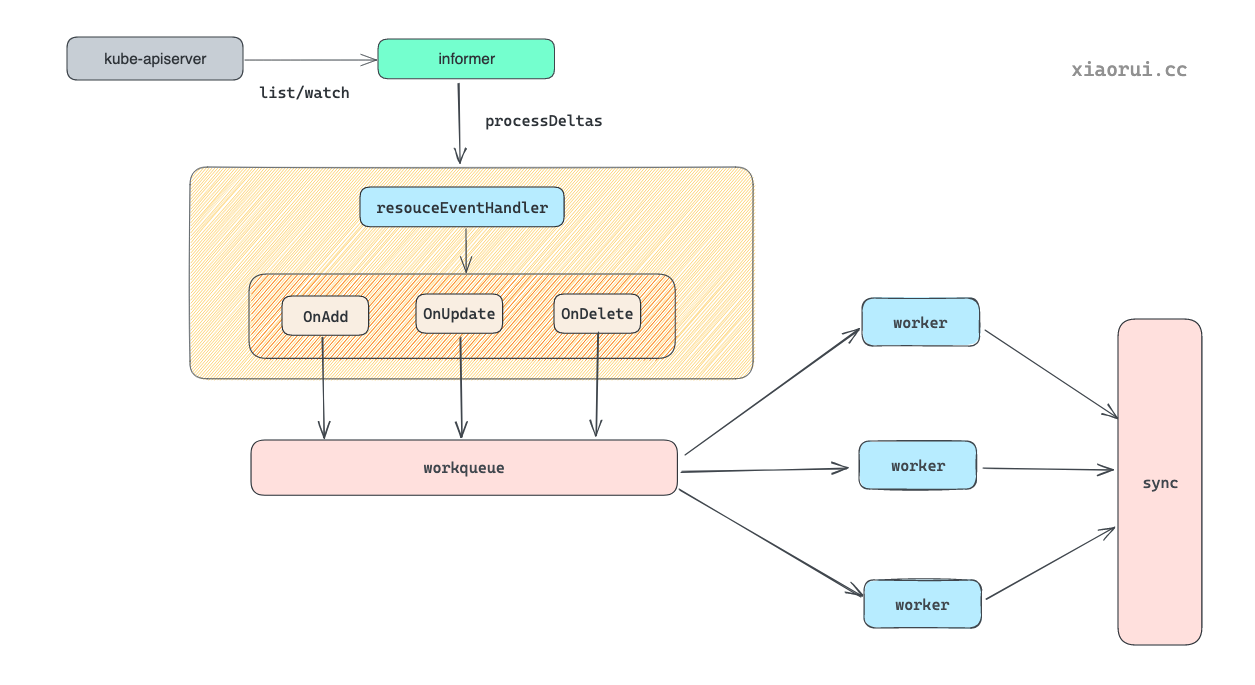
从 k8s controller/scheduler/kube-proxy/kubelet … 等组件源码中, 可以找到不少经典的 workqueue 的用法.
其简化的流程原理是这样. 先通过 k8s informer 监听资源的变更, 实例化 informer 时需注册 addFunc/updateFunc/deleteFunc 事件方法. 这事件方法对应的操作是把 delta 对象扔到 workqueue 里. 控制器通常会开启多个协程去 workqueue 消费, 拿到的对象后使用控制器的 sync 进行状态同步.