
bigcache 是 golang 编写的高性能的缓存库,其设计很巧妙,通过数据分片解决高并发下锁竞争的问题,通过把数据存到 ringbuffer 来规避 golang gc 的开销。
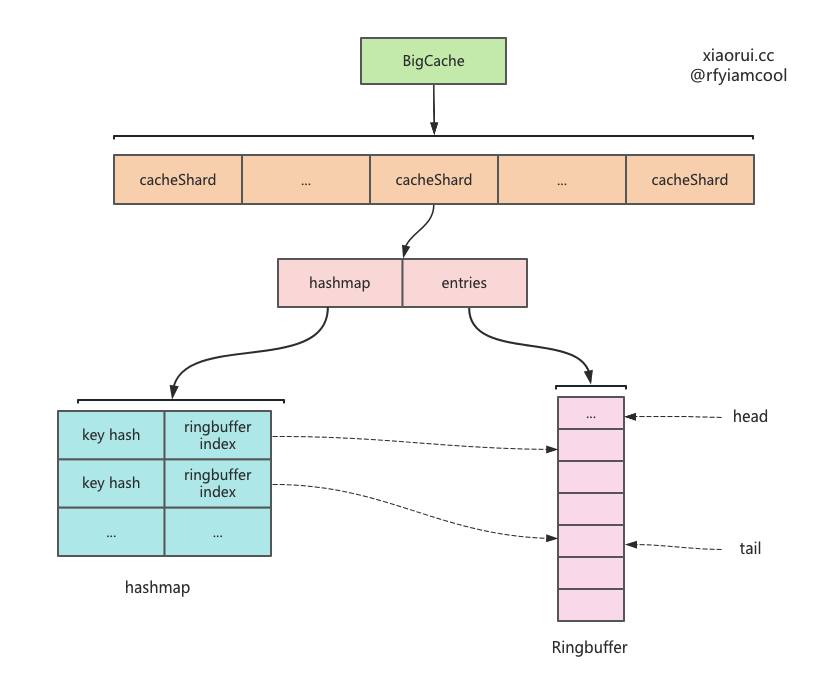
bigcache 内部使用分片来存储数据,每个分片内又使用 hashmap 存储key 的索引,而真正的数据通过编码后放在 ringbuffer 里。bigcache 没有使用主流的 lru 和 lfu 缓存淘汰算法,而是使用覆盖写来覆盖老数据,在 ringbuffer 已满时,先删除老数据,再尝试插入新数据。另外还通过 gc 垃圾回收期删掉过期的数据。
由于 bigcache 里数据是存在 []byte 类型的 ringbuffer 里,所以传入的 value 只能 []byte,不能存储其他类型。这样应用场景很是受限,毕竟业务上缓存的对象较为复杂,如果每次存取都需要序列化和反序列化,那么在一定量级下 CPU 开销会很可观。
bigcache 的实现原理跟 freecache、fastcache 大同小异,都使用了 ringbuffer 存放数据,可以很大程度降低 GC 的开销。这里的 ringbuffer 当然可以使用有名或匿名的 mmap 来构建,俗称堆外内存,但对于 golang gc 来说,mmap 和直接申请
[]byte的 gc 开销没大区别。如果使用文件 mmap 映射,当系统一直有文件读写,势必会对 page cache 进行 page 淘汰,这样基于 mmap 构建的 ringbuffer,必然会受之影响。
bigcache 高级用法
import (
    "log"
    "fmt"

    "github.com/allegro/bigcache/v3"
)

func main() {
    config := bigcache.Config {
            // 预设多少个数据分片,其大小必须是 2 的幂次方,因为这里使用位运算取摸,而非使用 %.
            Shards: 1024,

            // 缓存对象的生命周期,也就是过期时长
            LifeWindow: 10 * time.Minute,

            // 垃圾回收的运行周期,每隔 5 分钟尝试进行一次垃圾回收.
            CleanWindow: 5 * time.Minute,

            // rps * lifeWindow, used only in initial memory allocation
            MaxEntriesInWindow: 1000 * 10 * 60,

            // 设定的 value 的大小
            MaxEntrySize: 500,

            // bigcache 缓存的大小,单位是 MB.
            // 注意这是总大小,每个分片的大小则需要除以分片数,当为 0 时不限制。
            HardMaxCacheSize: 8192,
    }

    // 构建 bigcache 缓存对象
    cache, initErr := bigcache.New(context.Background(), config)
    if initErr != nil {
        log.Fatal(initErr)
    }

    // 写数据
    cache.Set("my-unique-key", []byte("value"))

    // 读数据
    if entry, err := cache.Get("my-unique-key"); err == nil {
        fmt.Println(string(entry))
    }
}
bigcache 实现原理
这里简述下 bigcache 读写数据实现原理,写操作是把数据写到 ringbuffer 里,然后在 hashmap 里记录 key 和 ringbuffer 索引的关系,读取的时候,自然是从 hashmap 里获取 key 的 ringbuffer index 索引值,然后从 ringbuffer 获取数据。
bigcache 中数据结构及布局
BigCache 数据结构.
type BigCache struct {
    // 数据分片
    shards     []*cacheShard

    // 缓存对象的生存时长, 也就是 ttl
    lifeWindow uint64

    // 时钟对象
    clock      clock

    // bigcahe 只实现了 fnv hash 算法
    hash       Hasher
    config     Config

    // 用来实现取摸位运算
    shardMask  uint64
    close      chan struct{}
}
cacheShard 数据分片的结构.
type cacheShard struct {
    // key 为 key hashcode, value 为 ringbuffer 的 offset
    hashmap     map[uint64]uint32

    // 使用 ringbuffer 构建的队列
    entries     queue.BytesQueue
    lock        sync.RWMutex

    // 对象复用
    entryBuffer []byte

    // 删除的回调方法
    onRemove    onRemoveCallback

    // 缓存对象的生存时长, 也就是 ttl
    lifeWindow   uint64
}
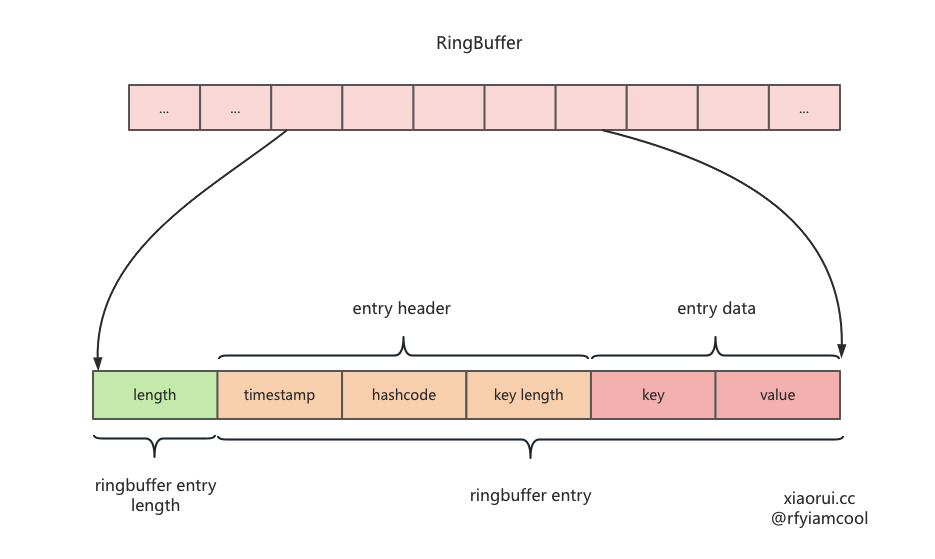
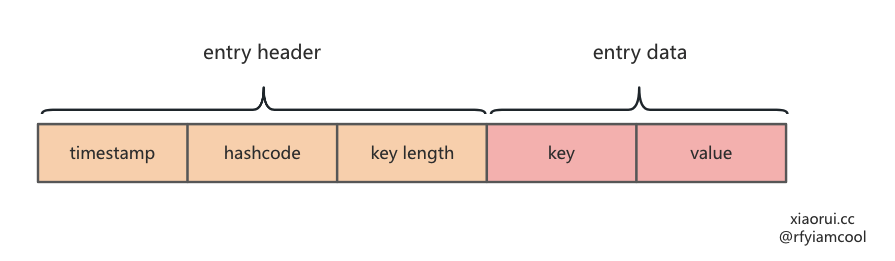
数据在 ringbuffer 中的编码.
取摸算法
关于取摸的计算, 想来大家可以一般使用 x%len 公式,但这个性能相对低效,而像 java jdk 和 redis 中的取模公式为 x&(len-1),当 hashtable 的长度是 2 的幂的情况下,这两者是等价的。
通过汇编可以看到,& 的汇编为 3mov+1and+1sub, % 的汇编为 2mov+1cdp+1idiv 。
根据 intel asm 的文档资料,& 操作只需 5 个 CPU 周期,而 % 最少需要 20 个 CPU 周期,显而易见,如果在意性能我们应该使用前者。
Set 写流程
Set 用来添加数据到指定的 shard 分片里。bigcache 预设了 1024 个分片,社区中高性能的 cache 库会实现分片的方法来解决锁竞争的问题。
// Set saves entry under the key
func (c *BigCache) Set(key string, entry []byte) error {
    // 通过 fnv hash 算法计算出 key 的 hashcode
    hashedKey := c.hash.Sum64(key)

    // 通过位运算得出 key 对应的 shard 分片
    shard := c.getShard(hashedKey)

    // 在 shard 里添加数据
    return shard.set(key, hashedKey, entry)
}
set 用来把数据写到 shard 的 ringbuffer 里,并设置 hashmap 索引,其流程如下。
- 获取当前的秒级别的时间戳,这里抽象了 clock 方法,只要是为了方便的后面的单元测试 ;
- 在 hashmap 里获取 key 以前的 ringbuffer 的 index 位置信息,如果不为 0,且在 ringbuffer 又可拿到该 entry,则进行删除 ;
- 编码待写入 ringbuffer 里的结构 ;
- 尝试把编码的数据写到 ringbuffer 里,如果空间小于 max 值,则会扩容,当无法扩容时,写入失败,说明无空闲空间,则尝试剔除最老的数据,然后再进行写入。
func (s *cacheShard) set(key string, hashedKey uint64, entry []byte) error {
    // 获取当前的秒级别的时间戳,这里抽象了 clock 方法,只要是为了方便的后面的单元测试.
    currentTimestamp := uint64(s.clock.Epoch())

    // 加锁,并发安全
    s.lock.Lock()

    // 在 hashmap 里获取 key 以前的 ringbuffer 的 index 位置信息.
    if previousIndex := s.hashmap[hashedKey]; previousIndex != 0 {
        // 如果不为 0,且在 ringbuffer 又可拿到该 entry,则进行删除
        if previousEntry, err := s.entries.Get(int(previousIndex)); err == nil {
            resetKeyFromEntry(previousEntry)
            delete(s.hashmap, hashedKey)
        }
    }

    // 编码待写入 ringbuffer 里的结构
    w := wrapEntry(currentTimestamp, hashedKey, key, entry, &s.entryBuffer)

    for {
        // 尝试把编码的数据写到 ringbuffer 里.
        if index, err := s.entries.Push(w); err == nil {
            // 如果成功写入,更新 hashmap 索引后,放锁返回.
            s.hashmap[hashedKey] = uint32(index)
            s.lock.Unlock()
            return nil
        }

        // 写入失败说明, 无空间,则尝试剔除最老的数据,然后再进行写入.
        if s.removeOldestEntry(NoSpace) != nil {
            s.lock.Unlock()
            return fmt.Errorf("entry is bigger than max shard size")
        }
    }
}
removeOldestEntry 在过期扫描部分再分析其实现.
resetKeyFromEntry 把 entry 中 hashcode 置为 0.
entry 的 [8:16] 字节存储了数据的 key hashcode,通过 resetKeyFromEntry 方法则可以把 hashcode 置为 0.
func resetKeyFromEntry(data []byte) {
    binary.LittleEndian.PutUint64(data[timestampSizeInBytes:], 0)
}
对数据进行编码
把要写到 []byte ringbuffer 的数据进行编码。
- 第一个字段为 8 字节,表明时间戳
- 第二个字段为 8 字节,是用 fnv(key) 拿到的 hashcode
- 第三个子弹为 2 字节,表明 key length
GC 垃圾回收通过时间戳来判断是否过期,通过 iterator 遍历缓存数据时,会过滤掉 hashcode 为 0 的数据,当delete 删除数据时,会重置 hashcode 为 0。通过 key length 拿到 key。
那么如何拿到 key 的 value ? 这是因为存到 ringbuffer 时,还会加一个总大小的 length。那么获取 value 的方法显而易见了。
const (
    timestampSizeInBytes = 8                                                       // Number of bytes used for timestamp
    hashSizeInBytes      = 8                                                       // Number of bytes used for hash
    keySizeInBytes       = 2                                                       // Number of bytes used for size of entry key
    headersSizeInBytes   = timestampSizeInBytes + hashSizeInBytes + keySizeInBytes // Number of bytes used for all headers
)

func wrapEntry(timestamp uint64, hash uint64, key string, entry []byte, buffer *[]byte) []byte {
    keyLength := len(key)
    blobLength := len(entry) + headersSizeInBytes + keyLength

    if blobLength > len(*buffer) {
        *buffer = make([]byte, blobLength)
    }
    blob := *buffer

    binary.LittleEndian.PutUint64(blob, timestamp)
    binary.LittleEndian.PutUint64(blob[timestampSizeInBytes:], hash)
    binary.LittleEndian.PutUint16(blob[timestampSizeInBytes+hashSizeInBytes:], uint16(keyLength))
    copy(blob[headersSizeInBytes:], key)
    copy(blob[headersSizeInBytes+keyLength:], entry)

    return blob[:blobLength]
}
ringbuffer 写时扩容
第一种库容的场景.
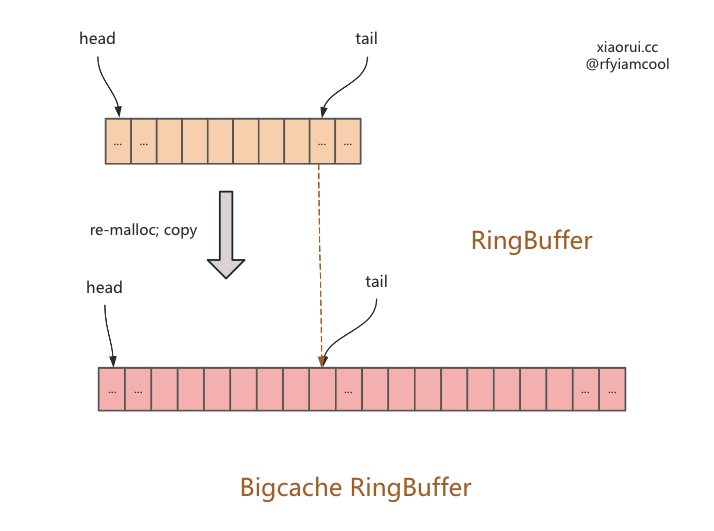
第二种库容的场景.

ringbuffer 扩容代码
func (q *BytesQueue) Push(data []byte) (int, error) {
    // 计算出 size
    neededSize := getNeededSize(len(data))

    // 如果没有足够空间插入
    if !q.canInsertAfterTail(neededSize) {
        // 回绕
        if q.canInsertBeforeHead(neededSize) {
            q.tail = leftMarginIndex
        } else if q.capacity+neededSize >= q.maxCapacity && q.maxCapacity > 0 {
            // 超过最大限制,不进行扩容,返回失败
            return -1, &queueError{"Full queue. Maximum size limit reached."}
        } else {
            // 进行扩容
            q.allocateAdditionalMemory(neededSize)
        }
    }

    index := q.tail

    // 写入数据
    q.push(data, neededSize)
    return index, nil
}

func (q *BytesQueue) allocateAdditionalMemory(minimum int) {
    start := time.Now()
    if q.capacity < minimum {
        q.capacity += minimum
    }

    // 默认两倍进行扩容
    q.capacity = q.capacity * 2
    if q.capacity > q.maxCapacity && q.maxCapacity > 0 {
        // 避免超过 max 值
        q.capacity = q.maxCapacity
    }

    // 实例化新的 []byte 数组.
    oldArray := q.array
    q.array = make([]byte, q.capacity)

    // 如果不相等
    if leftMarginIndex != q.rightMargin {
        // 把旧 ringbuffer 数据拷贝到新 ringbuffer.
        copy(q.array, oldArray[:q.rightMargin])

        // 出现了回绕
        if q.tail <= q.head {
            if q.tail != q.head {
                q.push(make([]byte, q.head-q.tail), q.head-q.tail)
            }

            // 重置指针位置
            q.head = leftMarginIndex
            q.tail = q.rightMargin
        }
    }

    q.full = false
}
Get 读取流程
Get 用来获取数据,计算 hashcode,获取对应的 shard,然后调用 get() 读取。
func (c *BigCache) Get(key string) ([]byte, error) {
    hashedKey := c.hash.Sum64(key)
    shard := c.getShard(hashedKey)
    return shard.get(key, hashedKey)
}
get 用来从 shard 里获取数据,其流程是先从 ringbuffer 里获取编码过的数据,然后通过解码获取 value。
func (s *cacheShard) get(key string, hashedKey uint64) ([]byte, error) {
    s.lock.RLock()
    // 从 hashmap 里获取 key hashcode 对应的 ringbuffer 索引,然后从 ringbuffer 读取到数据.
    wrappedEntry, err := s.getWrappedEntry(hashedKey)
    if err != nil {
        s.lock.RUnlock()
        return nil, err
    }

    // 从数据中解码得到 key,判断 key 是否一致,因为 hashmap 的 key 使用 fnv hash 计算,有冲突的概率,所以需要判断是否一致,不一致说明 hashcode 冲突,返回不存在的错误
    if entryKey := readKeyFromEntry(wrappedEntry); key != entryKey {
        s.lock.RUnlock()
        // 统计冲突的 metrics
        s.collision()
        return nil, ErrEntryNotFound
    }

    // 解码获取 value
    entry := readEntry(wrappedEntry)
    s.lock.RUnlock()

    // 统计缓存命中 metrics
    s.hit(hashedKey)
    return entry, nil
}
不习惯 bigcache 的命名,key 的值可以为 value,这里用来 entry 这个单词。
getWrappedEntry 从 ringbuffer 获取数据 wrappedEntry
func (s *cacheShard) getWrappedEntry(hashedKey uint64) ([]byte, error) {
    // 获取 ringbuffer 的索引
    itemIndex := s.hashmap[hashedKey]
    // ringbuffer 起始位是 1,所以 0 必然是为空.
    if itemIndex == 0 {
        s.miss()
        return nil, ErrEntryNotFound
    }

    // 从 ringbuffer 的指定位置里, 获取编码过的数据.
    wrappedEntry, err := s.entries.Get(int(itemIndex))
    if err != nil {
        s.miss()
        return nil, err
    }

    return wrappedEntry, err
}
readEntry 解码获取 key 的 value
func readEntry(data []byte) []byte {
    length := binary.LittleEndian.Uint16(data[timestampSizeInBytes+hashSizeInBytes:])

    // copy on read
    dst := make([]byte, len(data)-int(headersSizeInBytes+length))
    copy(dst, data[headersSizeInBytes+length:])

    return dst
}
Delete 删除 kv 流程
Delete 用来删除数据,先获取 key hashcode 对应分片,再执行分片的 del 进行数据删除。
func (c *BigCache) Delete(key string) error {
    hashedKey := c.hash.Sum64(key)
    shard := c.getShard(hashedKey)
    return shard.del(hashedKey)
}
del 用来在分片中删除数据,其流程如下。
- 预先使用读锁检查值是否存在,如果存在走删除流程 ;
- 根据 key hashcode 获取 ringbuffer index ;
- 从 ringbuffer 里获取编码过的 entry ;
- 删除 key hashcode 对应的位置 ;
- 把 entry 的 hash 值编码成 0。
这里先使用读锁来预检查 key 是否存在,存在后,再使用写锁来数据删除。首先 bigcache 已经分成了 1024 分片,避免了大量锁竞争问题,又因为删除的多是已知存在需删除的场景,预检查可能是徒劳的,虽然 cache 是读多写少的场景,但还是怀疑其优化是否有效。
func (s *cacheShard) del(hashedKey uint64) error {
    // 预先使用读锁检查值是否存在,如果存在走删除流程.
    s.lock.RLock()
    {
        itemIndex := s.hashmap[hashedKey]
        // ringbuffer 起始位是 1
        if itemIndex == 0 {
            s.lock.RUnlock()
            s.delmiss()
            return ErrEntryNotFound
        }

        if err := s.entries.CheckGet(int(itemIndex)); err != nil {
            s.lock.RUnlock()
            s.delmiss()
            return err
        }
    }
    s.lock.RUnlock()

    // 这里用写锁操作执行数据的删除.
    s.lock.Lock()
    {
        // 根据 key hashcode 获取 ringbuffer index
        itemIndex := s.hashmap[hashedKey]

        if itemIndex == 0 {
            s.lock.Unlock()
            s.delmiss()
            return ErrEntryNotFound
        }

        // 从 ringbuffer 里获取编码过的 entry.
        wrappedEntry, err := s.entries.Get(int(itemIndex))
        if err != nil {
            s.lock.Unlock()
            s.delmiss()
            return err
        }

        // 删除 key hashcode 对应的位置.
        delete(s.hashmap, hashedKey)
        // 尝试执行回调
        s.onRemove(wrappedEntry, Deleted)

        // 把 entry 的 hash 值编码成 0.
        resetKeyFromEntry(wrappedEntry)
    }
    s.lock.Unlock()

    // 删除命中统计
    s.delhit()
    return nil
}
GC 垃圾回收的设计
bigcache 的 gc 垃圾回收是指淘汰清理过期数据,其实现很简单,从头到尾遍历数据,看到过期就淘汰,不过期就中断 gc 任务。
需要注意的是 bigcache 的过期时间为固定的,不像 redis、ristretto 可随意配置不同的过期时间。bigcache 是按照 fifo 先进先出来存储的,所以先入 ringbuffer 的对象必然要比后进来的先淘汰。
bigcache 实例化 cache 对象时,会启动一个协程来进行垃圾回收。每隔一段时间进行一次垃圾回收,默认时长为 1 秒。
if config.CleanWindow > 0 {
    go func() {
        // 定时器,默认为 1秒
        ticker := time.NewTicker(config.CleanWindow)
        defer ticker.Stop()

        for {
            select {
            case <-ctx.Done():
                return
            case t := <-ticker.C:
                // 执行垃圾回收.
                cache.cleanUp(uint64(t.Unix()))
            case <-cache.close:
                return
            }
        }
    }()
}
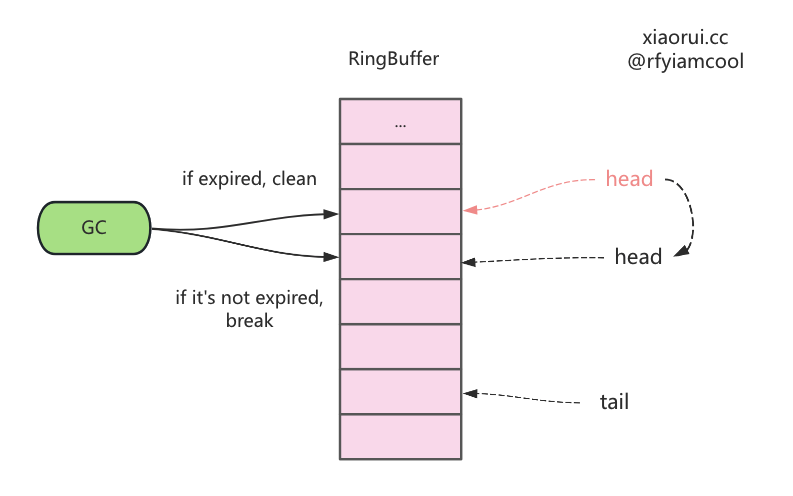
下面为垃圾回收的具体的实现,由于 bigcache 预设了 1024 个数据分片,那么进行垃圾回收时,自然需要遍历每个 shard 分片。清理的原理如下。
- 从 ringbuffer 的 head 头部指针获取最先入队的对象,这里是 get,不是 pop 操作 ;
- 从数据中获取数据的插入时间,通过
( 当前的时间 - 写入时间 ) > lifeWindow判断是否过期 ; - 如过期,则把 ringbufer 中头部的数据,也就是最老的数据干掉 ;
- 如没过期,则直接中断本地的垃圾回收任务。
简单说,每次判断 shard ringbuffer 中最老数据是否过期,过期则删掉,直到遍历到不过期的数据为止。这里的删除其实移动了 ringbuffer 的 header 偏移量位置指针。
lifeWindow 参数来控制过期的时长,当太小时,缓存数据很快会被 gc 清理掉。bigcache 的 delete 只是标记删除,数据依然在 ringbuffer 中。
那么被删除的数据什么时候会被清理掉,这里有两个时机。
- 写操作,当 ringbuffer 已满,又无法扩容时,则先删掉老数据,再把新数据写进去。
- 垃圾回收,从头开始进行过期判断,只要过期就清理。当满足 ringbuffer 的空闲阈值时,ringbuffer 也会回收空间。
func (c *BigCache) cleanUp(currentTimestamp uint64) {
    // 每个 shard 都需要执行清理.
    for _, shard := range c.shards {
        shard.cleanUp(currentTimestamp)
    }
}

func (s *cacheShard) cleanUp(currentTimestamp uint64) {
    s.lock.Lock()
    for {
        // 从 ringbuffer 的 head 获取最先入队的对象,这里是 get,不是 pop 操作.
        if oldestEntry, err := s.entries.Peek(); err != nil {
            // err 不为空,中断.
            break
        } else if evicted := s.onEvict(oldestEntry, currentTimestamp, s.removeOldestEntry); !evicted {
            // 判断是否过期,如过期则把 ringbufer 中头部的数据删掉,也就是最老的数据删掉.
            break
        }
    }
    s.lock.Unlock()
}

func (s *cacheShard) onEvict(oldestEntry []byte, currentTimestamp uint64, evict func(reason RemoveReason) error) bool {
    // 如果已过期,则执行回调把最老的数据删掉.
    if s.isExpired(oldestEntry, currentTimestamp) {
        evict(Expired)
        return true
    }
    return false
}
isExpired 用来判断是否过期,当 ( 当前的时间 - 写入时间 ) > lifeWindow 时,说明该 entry 已过期。
func (s *cacheShard) isExpired(oldestEntry []byte, currentTimestamp uint64) bool {
    // 从 entry 中获取插入的时间
    oldestTimestamp := readTimestampFromEntry(oldestEntry)
    if currentTimestamp <= oldestTimestamp {
        return false
    }
    // ( 当前的时间 - 写入时间 ) > lifeWindow 为已过期.
    return currentTimestamp-oldestTimestamp > s.lifeWindow
}
总结
bigcache 是 golang 编写的高性能的缓存库,其设计很巧妙,通过数据分片解决高并发下锁竞争的问题,通过把数据存到 ringbuffer 来规避 golang gc 的开销。
但 bigcache 不太适合业务上的缓存对象,原因有两个。
其一 bigcache 不支持 lru / lfu 这类缓存淘汰算法,而使用 fifo 淘汰旧数据,这样势必影响缓存命中率和缓存效果。
其二 bigcache 不能支持除了 []byte 以外的数据结构,毕竟业务上的对象多为自定义 struct。大家存取时不能每次都进行 encode、decode 编解码吧?毕竟使用社区中有一堆黑科技的 sonic json 库,序列化小对象也至少几十个 us,反序列化更是序列化的两倍。
个人更推荐使用 ristretto 构建业务的进程内缓存,其实现原理文章如下。